Last Updated / Reviewed: 02/10/2024
Execution Time: 2-4 hours
Goal: To create a fully functional lead generation landing page.
Ideal Outcome: You have a high-converting, well-researched, fully functional, and tested landing page for your lead generation campaigns that works on all devices, integrates with your analytics platforms and grows your email subscribers.
Prerequisites or requirements:
- A Google Tag Manager account: If you don’t have one you can follow SOP 004 (web version) for WordPress, SOP 065 (web version) for Shopify, SOP 066 (web version) for Squarespace.
- Facebook Pixel and Facebook Ads Account: If you don’t have the Facebook Pixel, you can follow SOP 005 (web version) or SOP 068 (web version) specifically for Shopify). If you don’t have a Facebook Ads account, you can follow SOP 010 (web version).
- Google Analytics: If you don’t have Google Analytics, you can follow SOP 009 (web version) or SOP 067 (web version)specifically for Shopify).
- Some chapters of this SOP require a SEMrush and Instapage account.
Why this is important: Landing pages are usually the best way to convert new leads.
Where this is done: In your landing page builder and Google Sheets.
When this is done: Every time you need a landing page created.
Who does this: The person responsible for content marketing and/or funnels.
Spying on your competitor’s landing pages and ads
Note: You don’t need a paid SEMrush account to follow this SOP but the number of reports you can run will be limited. In order to fully follow this SOP, you will need to create a free SEMrush account which allows you to get 10 extra requests.
Note 2: If you don’t have a paid account with SEMrush, follow this SOP very closely or run the risk of running out of reports before you are able to complete the SOP.
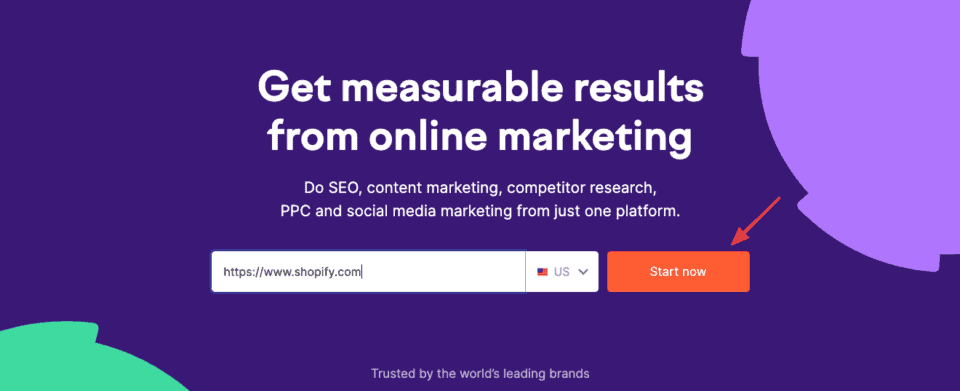
- Go to https://www.semrush.com/
- Type your competitor’s URL and click ‘Start Now’:
-
- Note: If you are prompted with the message ‘You’ve reached your SEMrush limit’:
- Type in the email address you would want your SEMrush account to be connected to → Enter a password for your account → Click ‘Register’ Note: There is no need to confirm your email for now, you will have access to the extra reports straight away.
- Note: If you are prompted with the message ‘You’ve reached your SEMrush limit’:
- On the left sidebar, click Advertising → Advertising Research → Ad Copies, and you will see a listing of ads your competitor is running.
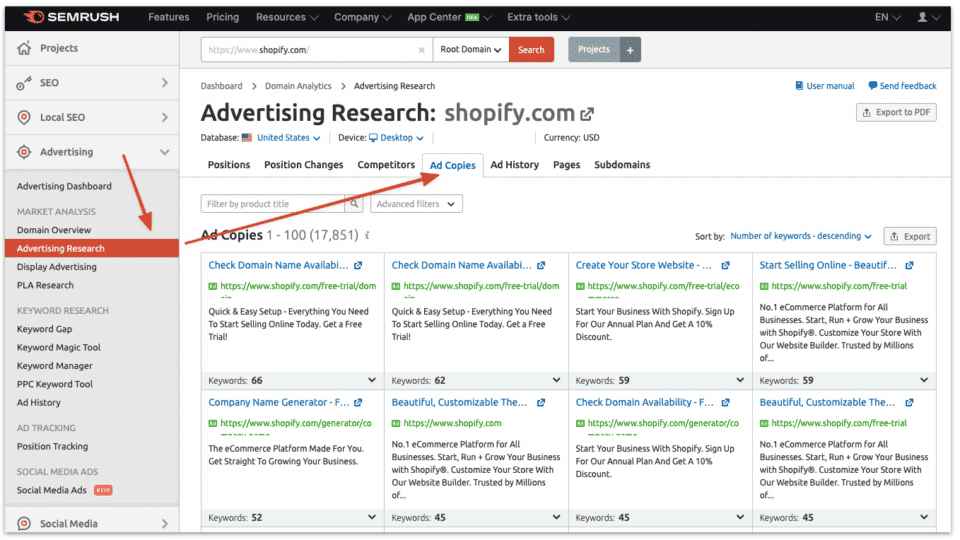
-
- Note: If you don’t see any ads it might be that your competitor is not big enough to be detected by SEMrush, they are not advertising online, or they just started, and the data isn’t there yet.
- Make sure you are applying the filters correctly:
- Note: For this example, “United States” and “Desktop” were selected. You should select the filters that make sense in your case.

- You will see a table with your competitor’s ads and landing pages, click the blue arrow button to check out the landing page.
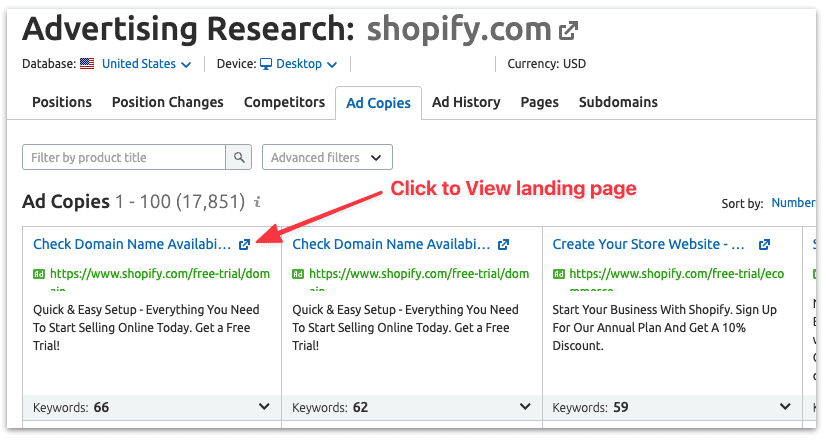
-
- If there are a lot of landing pages and you are unable to go through them all at this moment:
- Analyze the top 5 landing pages your competitor is running ads for. This list of ads and landing page are sorted by the number of keywords they’re targeting.
- If there are a lot of landing pages and you are unable to go through them all at this moment:

- Take note of what your competitor’s offers are, how they position themselves, and how they promote their landing pages.
Clearly defining your landing page’s message
- Open the Landing Page Creation Spreadsheet that accompanies this SOP.
- Fill out the initial description of this landing page:
- Internal Name: The name you want to give to this landing page inside your organization.
- Note: This name should be kept consistent across all your reports and tools. It should be clear enough so that it is easier to find with a simple search, or to understand what the landing page is about by simply reading it.
- Note 2: If you don’t have a naming convention yet, you can use: [Serial Number] – [Funnel Stage] – [Landing page goal] – [Some words to summarize what this page is about]
- Version: The version of the landing page this document refers to. If you want to document a landing page change, make a copy of the current document and increase the version number.
- Publish Date: The date when this landing page will be published while it’s in a draft. Once the landing page is published this date should reflect the actual publish date in case they don’t match.
- Internal Name: The name you want to give to this landing page inside your organization.
-
- Responsible: Who is responsible for making sure this landing page is delivered.
-
- Task URL: If you use a project management tool like Asana, link to the task here.
-
- Status:
- Planning Stage: While the Landing Page Creation Spreadsheet is being worked on and not all aspects are clearly defined.
- Design Stage: Usually follows the “Planning Stage”, at this stage the page is clearly defined, and the Web Designer is working on it.
- Ready to Publish: Traditionally follows the “Design Stage”, there might be some reasons why it wasn’t published yet (e.g.: the planned release date is in the future).
- Published: The landing page is live.
- Unpublished: The landing page is completed and was published at some point in the past, but it is not live at the moment.
- Status:
-
- URL: The URL where this landing page will be/is available.
-
- Title: The title for the landing page. This is seen by your users, and it will be the title that will be indexed by Search Engines.
- Note: The spreadsheet will alert you if your meta-description is too long. If that is the case, you might want to shorten it below 160 characters.
- Title: The title for the landing page. This is seen by your users, and it will be the title that will be indexed by Search Engines.
-
- Meta description: The meta description for this page. This will be visible in the search engines results page.
- Note: The spreadsheet will alert you if your meta-description is too long. If that is the case, you might want to shorten it below 320 characters.
- Meta description: The meta description for this page. This will be visible in the search engines results page.
-
- Indexed by Search Engines: If you want this page to be indexed by Search Engines select ‘Yes’.
- Note: If your page is only going to be live for a few days or if this is a private landing page that you only want users who have been given the link to access it, you will want to select “No”.
- Indexed by Search Engines: If you want this page to be indexed by Search Engines select ‘Yes’.
-
- Canonical URL:
- If you selected ‘Indexed by Search Engines: No’: You don’t need to fill this field.
- If you selected ‘Indexed by Search Engines: Yes’:
- If you will have multiple variations of this landing page that are extremely similar in content and purpose: Insert the URL of your main page.
- If you will only create one landing page version for this offer: Insert the URL of this landing page, it will be the same as the one defined before.
- Canonical URL:
-
- Favicon: Insert the URL of your ‘Favicon’.
- Note: If you don’t know the URL of your Favicon, typically you can find it by navigating to the path /favicon.ico of your domain.
- Favicon: Insert the URL of your ‘Favicon’.
- Fill out the social section:
- Facebook/G+ Sharing: Title: This is the title that will be displayed when your visitors share your page on Facebook or G+.
- Note: By default, the spreadsheet will copy the title of your landing page.
- Facebook/G+ Sharing: Title: This is the title that will be displayed when your visitors share your page on Facebook or G+.
-
- Facebook/G+ Sharing: Description: This is the description that will be displayed when your visitors share your page on Facebook or G+.
- Note: By default, the spreadsheet will copy the description of your landing page.
- Facebook/G+ Sharing: Description: This is the description that will be displayed when your visitors share your page on Facebook or G+.
-
- Facebook/G+ Sharing: Image: This is the image that will be displayed when your visitors share your page on Facebook or G+.
- Note: The recommended image size for Facebook is at least 1200×630 pixels. Images can be up to 8MB in size. Some cropping might occur when shared on other social networks.
- Facebook/G+ Sharing: Image: This is the image that will be displayed when your visitors share your page on Facebook or G+.
-
- Twitter Description: This is the text that you want to be used by default if the user tweets the page using the sharing buttons.
- Note: The spreadsheet will alert you if your twitter description is too long. If that is the case, you might want to shorten it below 280 characters (or 140 characters for some landing page builders).
- Twitter Description: This is the text that you want to be used by default if the user tweets the page using the sharing buttons.
- Fill out the targeting section:
- Persona: The persona(s) this landing page is aimed at.
- Note: If there are no personas defined input the target customer segment. (e.g.: Entrepreneur, CEO of small startup, etc.)
- Persona: The persona(s) this landing page is aimed at.
-
- Buyer’s Journey Stage: The stage of the buyer’s journey this landing page is aimed at.
- TOFU: Top of Funnel / Awareness
- MOFU: Middle Funnel / Consideration
- BOFU: Bottom Funnel / Conversion
- Buyer’s Journey Stage: The stage of the buyer’s journey this landing page is aimed at.
-
- User intent: When the user arrives on your landing page, what is he expecting to find? Usually, the Ad or the link that took the user to the page promises a specific offer.
- Example: “Getting a 50$ off coupon”, “Getting a free emoji cheat sheet to use with Facebook Ads”, “Getting a free trial”.
- User intent: When the user arrives on your landing page, what is he expecting to find? Usually, the Ad or the link that took the user to the page promises a specific offer.
-
- Traffic Source: How is the traffic being driven to this page?
- Example: Facebook Ads, SEO, etc.
- Traffic Source: How is the traffic being driven to this page?
-
- Landing Page Goal: What do you want the user to do on this page? What is the action you want the user to perform?
- Example: Purchase the product. Sign Up for the newsletter. Request a quote.
- Landing Page Goal: What do you want the user to do on this page? What is the action you want the user to perform?
- Fill in the Landing Page Elements section:
- Headline: This is the headline that will be on your landing page. If you don’t have a headline, you can leave it blank.
- Note: It is highly recommended to use headlines. Only in very rare cases, it is OK not to have a headline.
- Note 2: Confirm that the headline:
- Captures the user’s attention and interest.
- Introduces the user to what you are offering on the page or why it is relevant to them.
- Headline: This is the headline that will be on your landing page. If you don’t have a headline, you can leave it blank.
-
- Sub-headline: This is the sub-headline that will be on your landing page. Goes below the headline. If you don’t have a sub-headline, you can leave it blank.
- Note: The sub-headline typically will elaborate on the headline. After you’ve caught the user’s attention with your headline you might want to get more granular here.
- Sub-headline: This is the sub-headline that will be on your landing page. Goes below the headline. If you don’t have a sub-headline, you can leave it blank.
-
- Bullet points: Insert your bullet points here.
- Note: The bullet points should highlight the benefits of your offer, product, or service. Bullet-points should be short and clear.
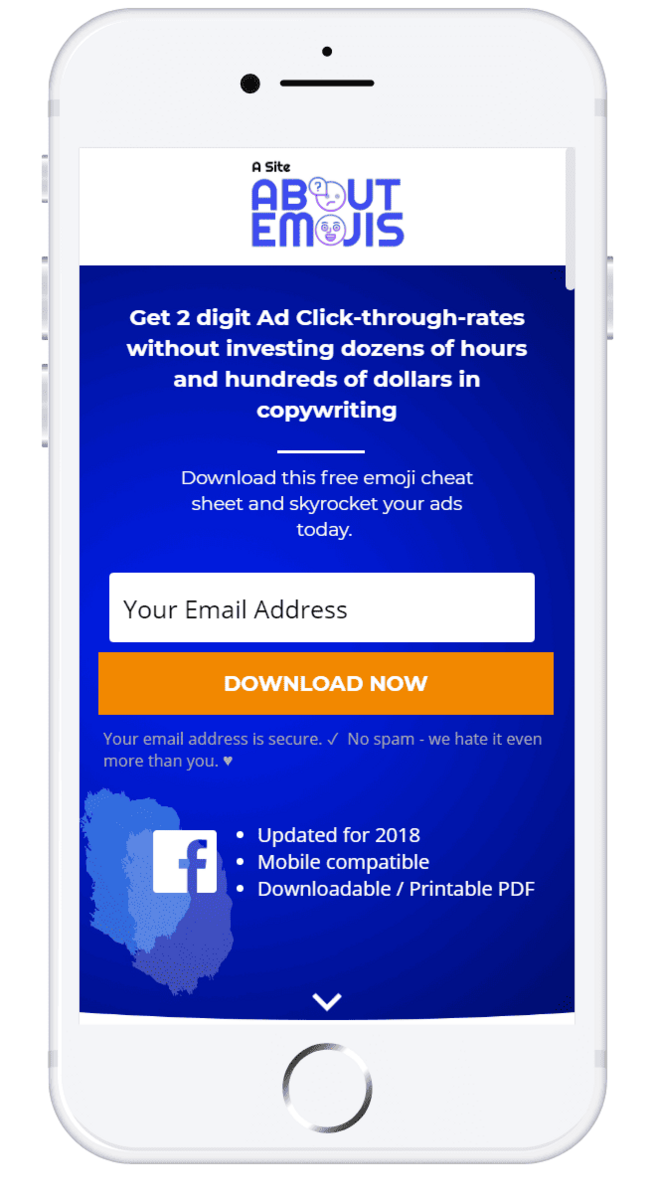
- Example: • Updated for 2023 • Downloadable / Printable PDF
- Note: The bullet points should highlight the benefits of your offer, product, or service. Bullet-points should be short and clear.
- Bullet points: Insert your bullet points here.
-
- Form fields: The form fields the user needs to fill on this page.
- Note: Minimize the fields as much as possible. Typically for every field that is added to the page a decrease in conversion rate is expected.
- Remember: You can always further segment your leads once you have their contact information, either by interacting personally or by creating automated workflows that will enrich the user profile by progressively asking for more information as users consume your offers and move down the funnel.
- Form fields: The form fields the user needs to fill on this page.
-
- Call-to-action: The text that will be on the form submission button.
- Note: Avoid dull call-to-actions such as ‘Submit’. Your call to action should start with a verb (Example: ‘Enroll’, ‘Download’, ‘Request’, ‘Get’) and should be very short (not more than 5 words).
- Example: ‘Download Your Guide Now’
- Note 2: The Landing Page Spreadsheet Template will alert you if you are missing a CTA.
- Example: ‘Download Your Guide Now’
- Note: Avoid dull call-to-actions such as ‘Submit’. Your call to action should start with a verb (Example: ‘Enroll’, ‘Download’, ‘Request’, ‘Get’) and should be very short (not more than 5 words).
- Call-to-action: The text that will be on the form submission button.
-
- Trust/Authority Elements: The assets that you can leverage today that will demonstrate to the user that your brand can be trusted, and that other users recommend it.
- Note: These elements are recommended in almost all cases, but especially if:
- Your brand is not recognized or trusted by the users that you are going to be bringing to that page.
- You’re asking the user to commit to you at a higher level than the one he might be comfortable with.
- Example: Selling a high-ticket product to a user that has not had any transaction with you in the past. Asking for the user’s phone number in the first interaction.
- Note 2: If you are unsure on what elements you may want to use, or may be used in your industry, refer back to “Spying on your competitor’s landing pages and ads” and analyze your competitor’s trust elements.
- Example of Trust/Authority Elements:
- Real testimonials from your customers or from other users that received that offer.
- Brands your business has worked with.
- Media outlets where your brand has been featured in.
- Number of clients that currently use your product or service.
- If your business requires a license, your license number, or certifications it features.
- Any other asset that you can leverage that will increase the user’s confidence in your brand.
- Example: Selling a high-ticket product to a user that has not had any transaction with you in the past. Asking for the user’s phone number in the first interaction.
- Note: These elements are recommended in almost all cases, but especially if:
- Trust/Authority Elements: The assets that you can leverage today that will demonstrate to the user that your brand can be trusted, and that other users recommend it.
-
- Guarantee: If you offer a guarantee to your customers type it out here.
-
- Personalized Elements: If your landing page is going to feature any kind of personalization, describe it here.
- Example: “Our emoji list features local emojis, we’ve got {Personalization: Visitor’s city} specific emojis. Check them out.”
- Note: Make sure your landing page builder supports this feature or that you have the technical capabilities to implement this feature.
- Example: “Our emoji list features local emojis, we’ve got {Personalization: Visitor’s city} specific emojis. Check them out.”
- Personalized Elements: If your landing page is going to feature any kind of personalization, describe it here.
-
- Time-restrictions: If your offer is time-restricted describe it here.
- Example: ‘Available for the next 3 days only.’
- Time-restrictions: If your offer is time-restricted describe it here.
-
- Copy Document: If your landing page will feature any additional copy aside from the elements that are on this spreadsheet, link to your Google Docs here.
-
- Images: If you want to feature images on your landing page, link to them here.
- Note: Make sure your images are relevant to what you are communicating on the landing page.
- Images: If you want to feature images on your landing page, link to them here.
-
-
- Remember: Adding unnecessary/irrelevant images will both decrease page speed and divert the user’s attention from what you are trying to communicate. Every image must have a clear purpose.
-
-
- Videos: If you want to feature videos on your landing page, link to them here.
- Note: Make sure your videos are relevant to what you are communicating on the landing page.
- Remember: Adding unnecessary/irrelevant videos will both decrease page speed and divert the user’s attention from what you are trying to communicate. Every video must have a clear purpose.
- Videos: If you want to feature videos on your landing page, link to them here.
-
- Logo: The URL of the logo that will be used on this landing page.
Designing your landing page using Instapage
Note: This SOP will use Instapage as a landing page builder. If you don’t have a landing page builder yet, you can sign up with Instapage here , they offer a 14-day free trial (credit card is required). The Core plan will fit most needs, but if you are considering doing A/B testing or more easily do landing page personalization (covered on this SOP) you should select the Optimizer plan.
Note 2: There are several other solutions available that might fit your needs as well. Traditionally, their interfaces should be similar, and you should be able to generally follow this SOP with another landing page builder.
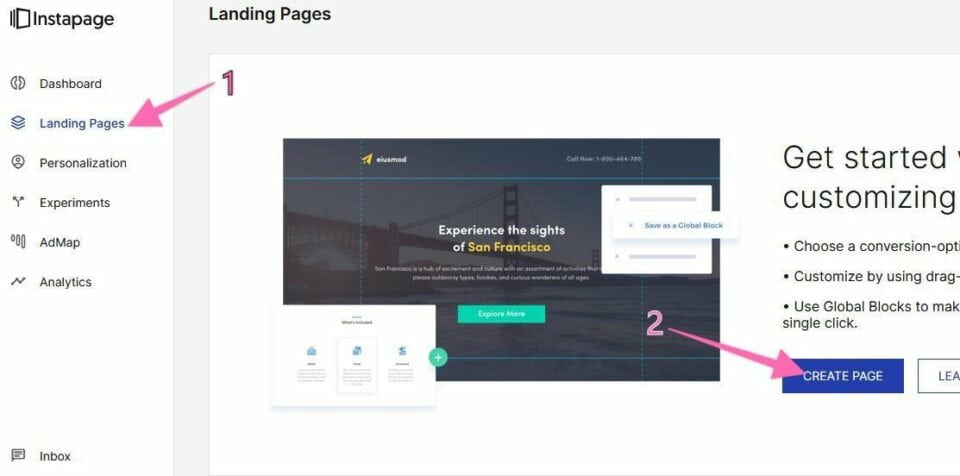
- Go to your Instapage Dashboard by clicking here and logging in to your account.
- Navigate to ‘Landing Pages’ in the left sidebar and click ‘Create Page’.
- ‘Select a Layout’ based on the purpose of your landing page.
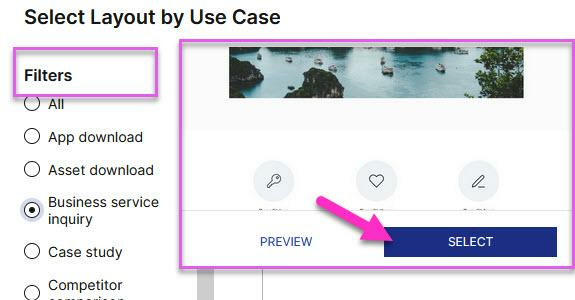
- Select the layout (template) from the list that best fits your purpose by clicking on its image.
- Note: Your landing page general look and feel should mimic the one you are using on your ads as much as possible, and both should fit your brand image.
- Note 2: Make sure the template you select already accommodates your needs (if you have a video, select one that has a placeholder for a video, if you have testimonials, select one that already has a testimonial section, etc.).
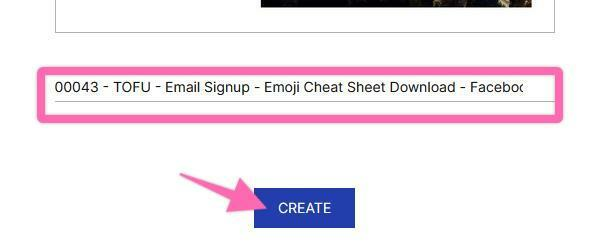
- Paste the internal name that you have previously defined → Click ‘Continue’.
- Note: If you are presented with a tutorial, you can either go through it by clicking “Next” or click “X” to close the popup.
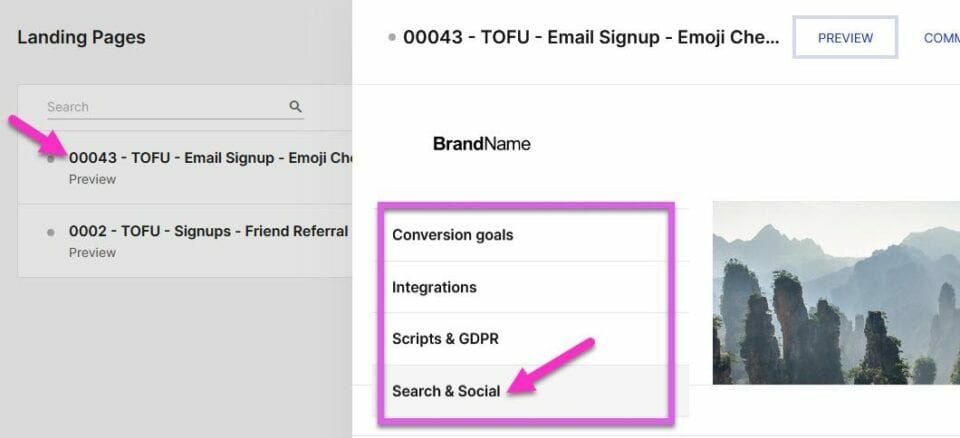
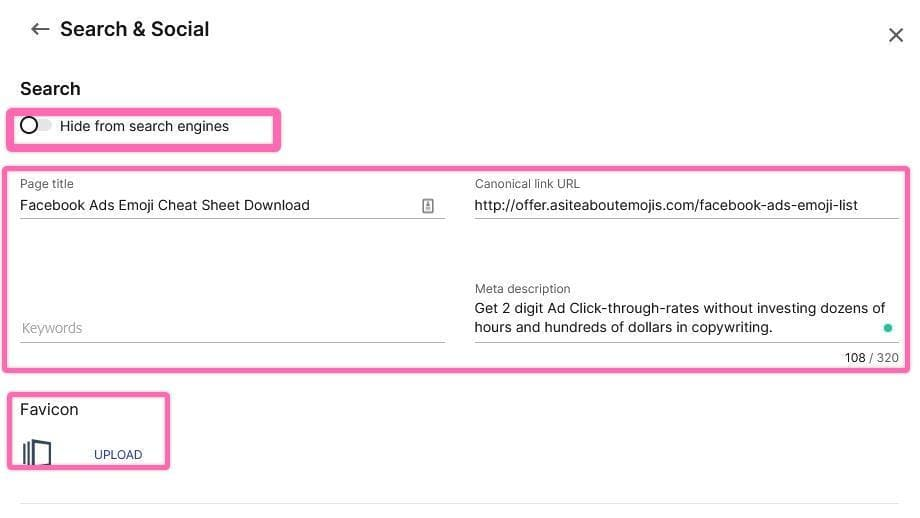
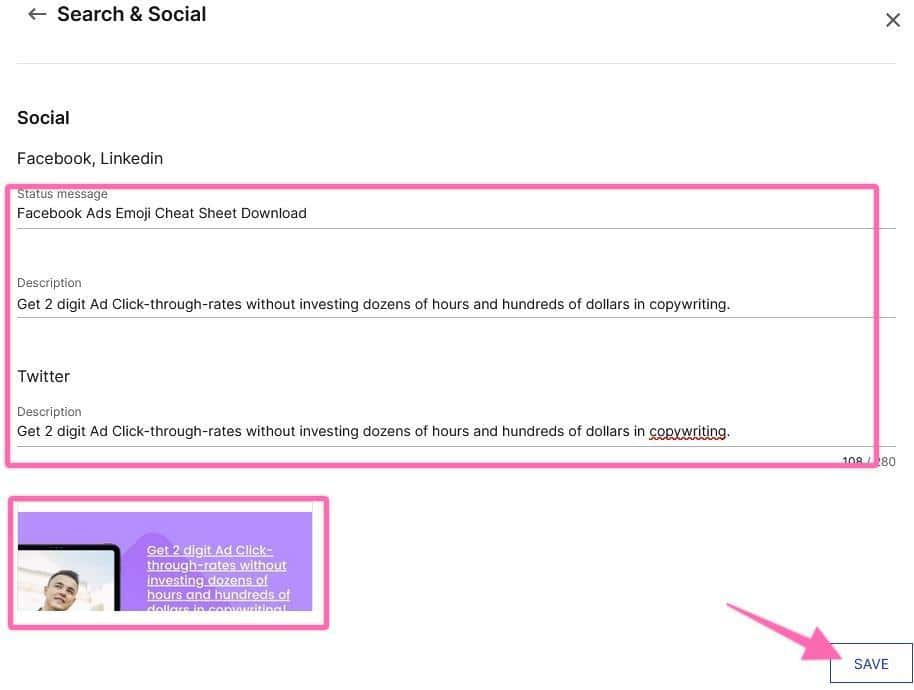
- Click the page name → ‘Search & Social’ → Paste the values from the spreadsheet under ‘Search Engine Optimization’ → Click on the left arrow on the top navigation menu.
- Scroll down → Fill in the fields under ‘Social’ → Paste the values from the Spreadsheet → Click ‘Save’ at the bottom part.
- Navigate away from ‘Search & Social’ and click the ‘Edit Design’ button.

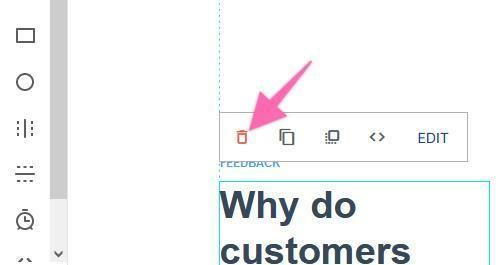
- Go through the Landing Page Creation Spreadsheet and delete all elements on your landing page builder but are not on your ‘Landing Page Elements’ or ‘Checklist’ section.
- Note: You can delete elements or ‘blocks’ by clicking on them and then hitting the ‘trash can’ icon.
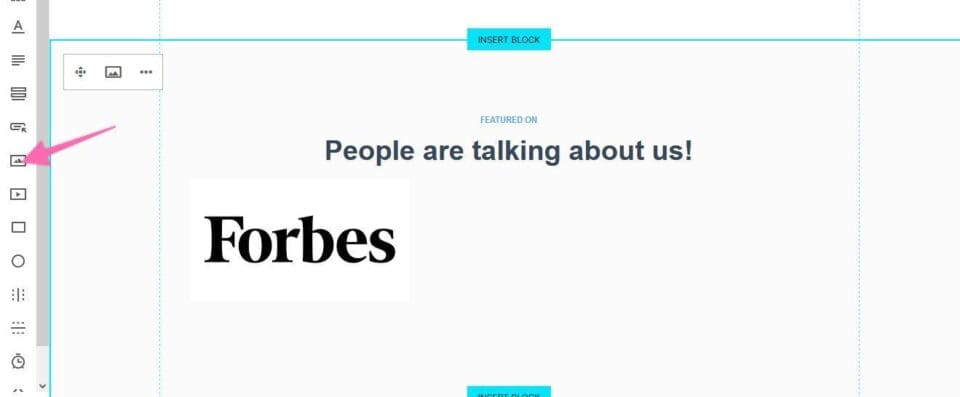
- Go through the Landing Page Creation Spreadsheet and add all elements to your landing page builder that are on your ‘Landing Page Elements’ or ‘Checklist’ section but are not on the template you selected.
- Note: You can add elements by clicking on the element you are looking for on the left sidebar:
- Arrange elements by dragging and dropping them to where you want them to be and resize them by selecting the element and dragging it from the corner.
- Remember: Clicking and double-clicking on an element will show you the available options for that element.
- Note: If you are unsure or don’t have a strong reason to change the order of the landing page elements skip this step and leave them as they were initially on the template.

- Open the Landing Page Creation Spreadsheet → Go through each line under the ‘Landing Page Elements’ section → Copy the values → Paste on Instapage on the respective section. → Arrange and resize any elements that might be out of place.
- Click ‘Preview’ and check how your page looks on desktop.

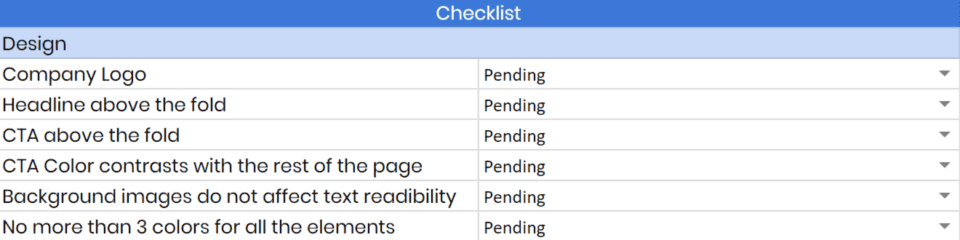
- Open the Landing Page Creation Spreadsheet and on the “Design Checklist” section make sure you are tackling the whole list.
- If everything looks ok. On the top bar click ‘Mobile’:
- Note: Even if you are not planning on promoting this page for mobile devices you will want to make sure the mobile version is still functional. Users may share that page on social networks or link to it online and if they do that It is expected to see ’Mobile’ traffic incoming.

- Note: Even if you are not planning on promoting this page for mobile devices you will want to make sure the mobile version is still functional. Users may share that page on social networks or link to it online and if they do that It is expected to see ’Mobile’ traffic incoming.
- Arrange and resize your elements until it looks ok on mobile.
- Note: It is likely that your page will look messy on mobile at this point.
- Arrange and resize your elements.
- Click ‘Preview’ and make sure your page looks ok on mobile:
- Open the Landing Page Creation Spreadsheet and on the ‘Design Checklist’, go through every line and mark it as ‘Done’ if that is the case.
- Note: Make sure all of them are valid both for the “Desktop” and the “Mobile” version.
- Note: Make sure all of them are valid both for the “Desktop” and the “Mobile” version.
- That’s it! Once you’ve gone through the whole spreadsheet, you’re ready to publish your landing page.
Publishing your landing page using Instapage
Note: This SOP is focused on publishing on a WordPress blog. The process varies slightly using a different CMS.
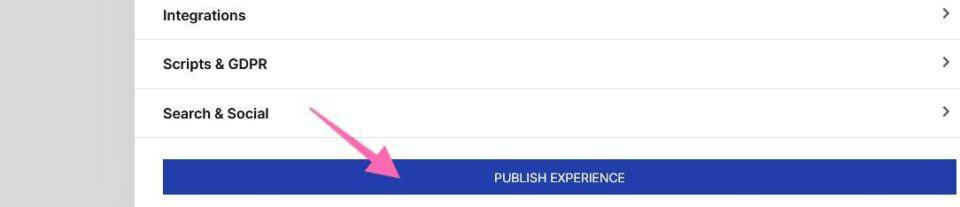
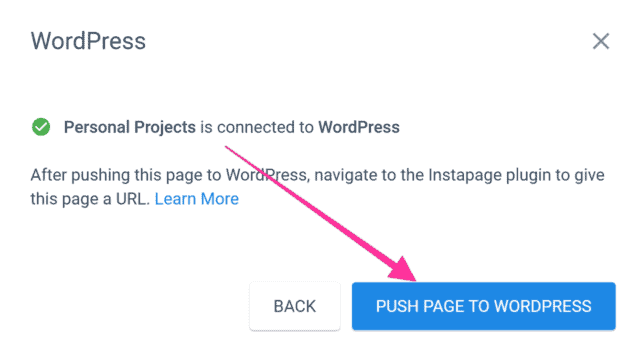
- Click ‘Publish Experience’.
- Select how you’d like to publish the page. Note: This SOP covers the WordPress publishing option.
- Click ‘Push page to WordPress’.
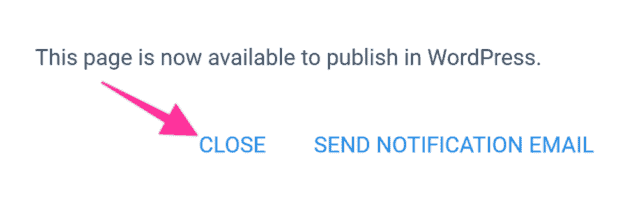
- Click ‘Close’.
- Open your blog’s WordPress Admin;
- On the sidebar, click ‘Instapage’.
- Click Add Page → Select the landing page you created. → Enter the URL of the landing page (it was already defined on your Landing Page Creation Spreadsheet )
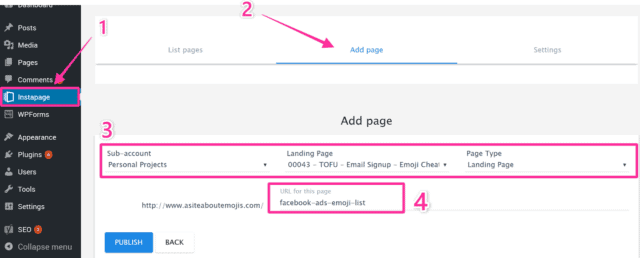
- Click ‘Publish’.
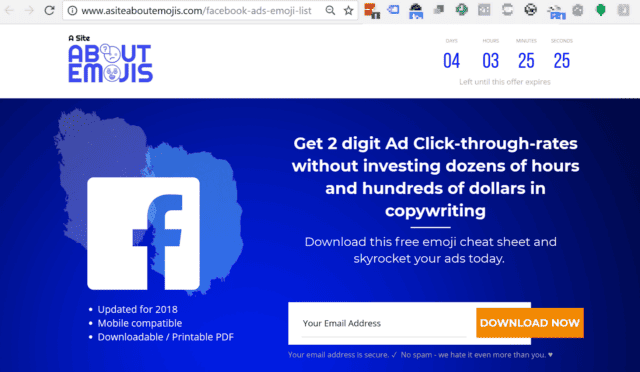
That’s it! Your landing page should now be live, and you can view it by opening it on your browser.
Setting up tracking
- Check if you do not have Google Tag Manager running on your landing page already.
- Note: If you are unsure you can follow the process outlined on SOP 004 (web version) , refer to the section ‘QA-ing your installation’.
- Note 2: If you already have Google Tag Manager installed on your website, move on to step 4.
- If Google Tag Manager is not running on your landing page follow the instructions outlined here to set up Google Tag Manager.
- Note: If you are not using Instapage, check with your landing page builder platform if an integration is already available. It is usually available.
- Make sure Google Tag Manager is running on your landing page now.
- Note: If you are unsure you can follow the process outlined in SOP 004 (web version), refer to the section ‘QA-ing your installation’.
- Make sure Google Analytics and the Facebook Pixel are running on your website using Google Tag Assistant and the Facebook Pixel Helper extension.
- Note: If you are unsure on how to test it you can follow the following SOPs:
- Testing the Facebook Pixel: SOP 005 (web version). (QA-ing the Facebook Pixel)
- Testing Google Analytics: SOP 009 (web version). (Verify your set up with Google Tag Assistant)
- Note: If you are unsure on how to test it you can follow the following SOPs:
- Setup and test your conversion goals:
- For Google Analytics: Follow SOP 021 (web version).
- For Facebook Ads: Follow SOP 017 (web version).
Testing your landing page
- Open the landing page on your browser.
- Open the Landing Page Creation Spreadsheet and scroll down to the Functionality Checklist section.
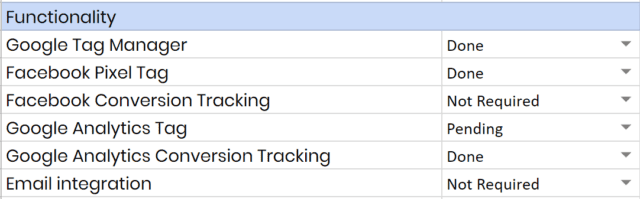
- Mark all the lines accordingly as “Done” or “Not Required”. Note: Usually all should be marked as “Done”, make sure you have a good reason to mark one as “Not Required”.
- Google Tag Manager: Mark as “Done” if you have Google Tag Manager running on your landing page.
- Note: You can check if Google Tag Manager is running on your website by following SOP 004 (web version), refer to the chapter ‘QA-ing your installation.’ If you don’t have Google Tag Manager on your website, you can follow the steps detailed in the same SOP If you are running a WordPress website.
- Google Tag Manager: Mark as “Done” if you have Google Tag Manager running on your landing page.
-
- Facebook Pixel Tag: Mark as done if you have the Facebook pixel on your landing page.
- Note: You can check if the Facebook pixel is on your landing page by following SOP 005 (web version), refer to the chapter ‘QA-ing the Facebook Pixel’. If you don’t have the Facebook Pixel on your website you can follow the steps detailed in the same SOP.
- Facebook Pixel Tag: Mark as done if you have the Facebook pixel on your landing page.
-
- Facebook Conversion Tracking: Mark as done if you have the Facebook conversion tracking on your landing page.
- Note: You can check if the Facebook conversion tracking is working properly on your landing page by following SOP 017 (web version), refer to the chapter ‘Check if conversions are being tracked properly’. If you don’t have the Facebook Conversion Tracking implemented on your website, you can follow the steps detailed in the same SOP.
- Facebook Conversion Tracking: Mark as done if you have the Facebook conversion tracking on your landing page.
-
- Google Analytics Tag: Mark as done if you have Google Analytics on your landing page.
- Note: You can check if you have Google Analytics on your landing page by following SOP 009 (web version) refer to the chapter ‘Verify your set up with Google Tag Assistant’. If you don’t have Google Analytics implemented on your website, you can follow the steps detailed in the same SOP.
- Google Analytics Tag: Mark as done if you have Google Analytics on your landing page.
-
- Google Analytics Conversion Tracking: Mark as done if you have Google Analytics Conversion Tracking on your landing page.
- Note: You can check if you have Google Analytics Conversion Tracking on your landing page by following SOP 021 (web version), refer to the chapter ‘Testing your Google Analytics Goals’. If you don’t have Google Analytics Conversion Tracking implemented on your website, you can follow the steps detailed in the same SOP.
- Google Analytics Conversion Tracking: Mark as done if you have Google Analytics Conversion Tracking on your landing page.
-
- Email Service Provider Integration: Mark as done if you have integrated your ESP.
- Note: If you are using Instapage and Mailchimp you can follow the guide on how to do the integration here .
- Email Service Provider Integration: Mark as done if you have integrated your ESP.
-
- Form Submission: If you have tested submitting the form on the landing page (both on desktop and mobile), and confirmed that the lead was correctly recorded, mark it as ‘Done’.
-
- 302 Redirect test: If you are running A/B tests, check if your tool is using redirects to send users to the different versions. If it is, check if 302 Redirects are being used instead of 301 Redirects. Note: you can check redirect types by following the “testing section” of SOP 051 (web version).
-
- Thank You Page Created: If you choose to send the users to a “Thank you” page once they have submitted the form, mark as ‘Done’.
-
- Spell Checked: If you have run your landing page through a spell checker mark as ‘Done’.
-
- Sharing Buttons: If you have shared your landing page on Facebook, Google+, Twitter, and LinkedIn and the title, the image, and the description look OK, mark it as ‘Done’.
-
- Terms and Conditions: If you have the Terms and Conditions (or a link for those) on your landing page, mark as ‘Done’.
-
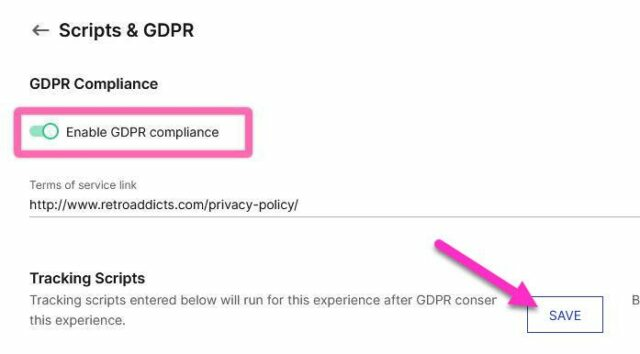
- Privacy Policy: You can turn on GPDR compliance under ‘Scripts and GPDR’ on Instapage (If you have the Privacy Policy (or a link for it) on your landing page, mark as ‘Done’.)
-
- Opt-in Checkbox: If legally required by the jurisdiction your business is subject to, you might need to have a Checkbox for users to agree with the Privacy Policy and/or Terms and Conditions before submitting the form.
- Navigation removed: In almost all cases, removing the header navigation (or any other navigation elements/links) from your landing page will result in a better conversion rate.
- Mobile Device Test: Perform the following test (ideally on both an Android and an iOS device)
- On an Android device:
- Open the Chrome App
- Navigate to your landing page
- Scroll down to the bottom of the page and make sure everything looks OK.
- Fill in the form and submit it.
- Make sure everything works as intended.
- On an Android device:
-
-
- On an iOS device:
- Open the Safari App.
- Navigate to your landing page.
- Scroll down to the bottom of the page and make sure everything looks OK.
- Fill in the form and submit it.
- Make sure everything works as intended.
- On an iOS device:
-
-
-
- If both tests were successful, mark it as ‘Done’.
-
-
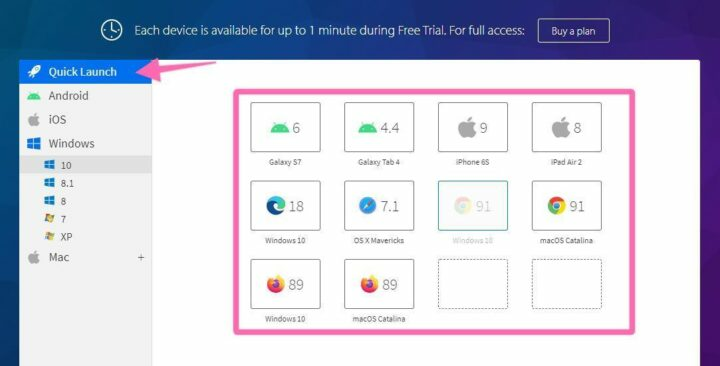
- Browser Compatibility Test: Perform the following test:
- On your desktop browser navigate to https://live.browserstack.com/ Note: You just need an email signup to access the free plan. It is enough unless you mind having a few minutes of wait time sometimes.
- Browser Compatibility Test: Perform the following test:
-
-
- Choose ‘Quick Launch’ to test how your landing page looks on different browsers and devices. Click on each browser icon to view. On the free plan, you only have 1 minute to view the page:
-
-
- Speed Test: Perform the following test:
-
-
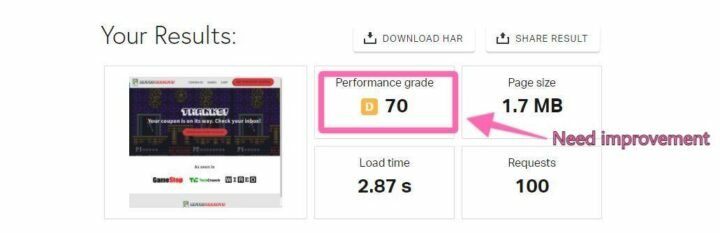
- Navigate to https://tools.pingdom.com
-
-
-
- Enter your Landing Page’s URL → Select the location closer to where your target audience is → Click “Start Test”
-

-
-
- Once the test is finished, scroll down to see your results. Make sure you have at least a performance grade of “B”, less than 5s load time, and less than 4MB.
- Note: If that is not the case, make sure your images are optimized, and there are no images or videos that you can remove from your landing page to make it load faster.
- Once the test is finished, scroll down to see your results. Make sure you have at least a performance grade of “B”, less than 5s load time, and less than 4MB.
-
-
-
- That’s it! If everything looks OK, mark it as ‘Done.’
-