Last Updated / Reviewed: 02/09/2024
Execution Time: 1 – 6h
Goal: Migrating an existing non-SEO friendly URL structure on a WordPress website to an SEO-friendly one, while mitigating any potential damage (e.g. if your content is already indexed and ranked, you might notice organic traffic drops and 404 errors).
Ideal Outcome: Your SEO-friendly URL structure will help Google index and rank your site better – and you will be able to achieve this while minimizing traffic drops.
Prerequisites or requirements:
This SOP applies only to WordPress websites. Also, you will need to have access to the Google Search Console. If you don’t know how to set up your Google Search console, you can check out SOP 020 (web version).
Why this is important: The more SEO-friendly your website is, the more likely it is that it will land in the first page of the Search Engine Results Pages.
Where this is done: In WordPress Admin Panel and Google Search Console.
When this is done: Preferably, when you launch a website. However, it can be done afterwards.
Who does this: The person responsible for website management, or SEO.
Know the recommended URL structure
There are two types of URL structure that typically offer the best results:
- /%postname%/ This is the most general URL structure you can follow – and it is the one that applies in most cases.
- /%category%/%postname% Sometimes, it makes sense to use this structure, particularly when you take into account any (or all) of the following:
-
- Content strategy and user experience: If you have devised a content strategy where categories play an important role, you might want to use this type of URL structure as It will also be easier for users to find a particular section on the site if it’s clearly structured according to different categories;
- Tracking: Some platforms will be easier to track if you use the category before the post name.
- Example: If your website sells emojis for Men and Women, and your want to create a facebook custom audience that targets all the users that visited the Men’s emoji section you can do it easily by creating a rule that includes all the users that visited a URL that contains /men/.
Check your current URL structure
To see your current URL structure, follow these steps:
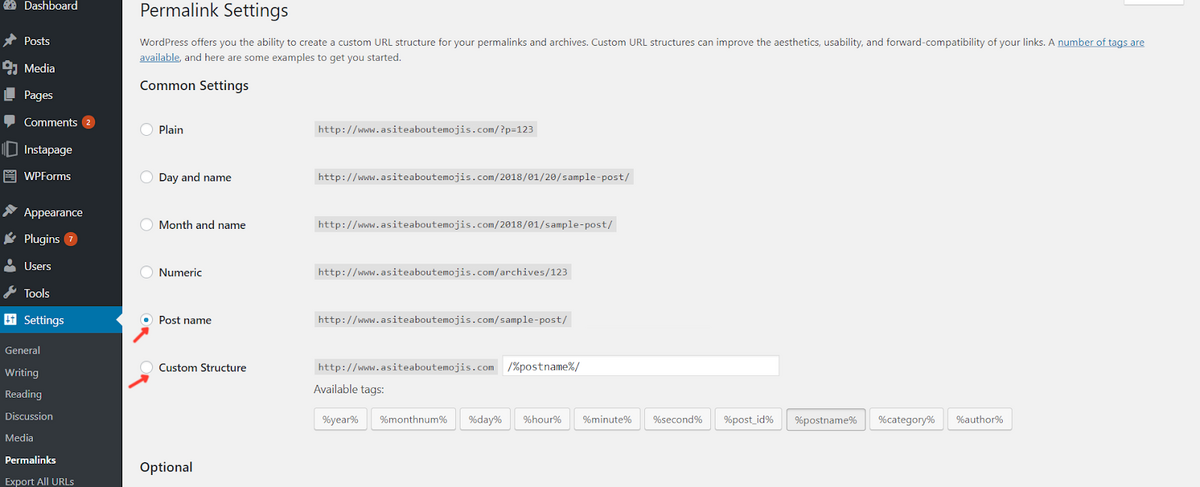
- Go to your WordPress Admin Panel → Settings → Permalinks;
- See which of the options is checked.
-
- If the “Post Name” or the “Custom Structure” (with “/%category%/%postname%” as specification) are checked, you’re all good, there is no need to follow this SOP anymore. 🙂
- If your website is following a different structure than either of the aforementioned ones, move on to the next section.
Decide whether you should migrate the URL structure or not
Before moving on to the actual migration process, you should first assess your particular situation and decide whether or not this is worth it for you. Here are some of the reasons to proceed further and migrate your website to an SEO-friendly URL structure:
- You don’t have a lot of pages already indexed by Google;
-
- You can check this by using the search operator “site:domain” (e.g. “site:asiteaboutemojis.com”). You can do it by following these steps:
- Go to Google.com
- Type “site:yoursite.com”
- Remember: Replace “yoursite.com” with your actual website URL.
- Look at the number of results Google shows – those are roughly the pages that have been indexed so far.
- Remember: Replace “yoursite.com” with your actual website URL.
- You can check this by using the search operator “site:domain” (e.g. “site:asiteaboutemojis.com”). You can do it by following these steps:
-

Your business and website can afford a brief drop in organic traffic for a few weeks/months. If your site doesn’t receive much or any organic traffic, then you don’t need to worry about this, just proceed with the migration;
- Your URL structure uses post IDs and doesn’t include any of the keywords you might want to target;
- There aren’t many external websites linking to pages on your Website
-
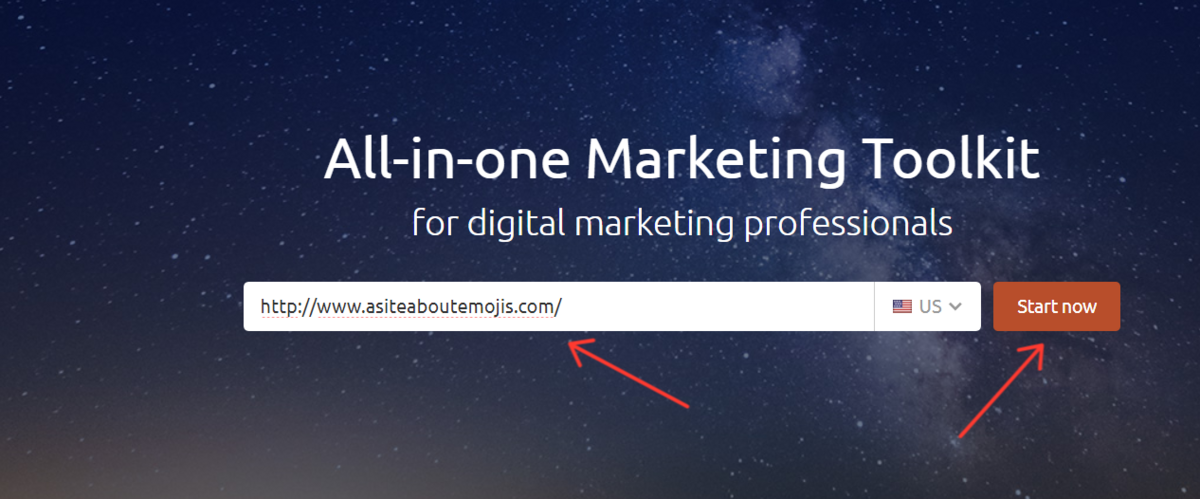
- You can check this with SEMRush:
- Go to SEMRush.com (non-affiliate link: SEMRush)
- Enter your website URL
- Click “Start Now”
- You can check this with SEMRush:
-
-
- If you haven’t registered to SEMRush before, or you aren’t logged in, a pop-up will appear on the screen. When this happens,register to get 10 free requests OR log in to your existing account.
- Look at the “Backlinks” section – it will show you the external sites that are linking to your domain.
-
-

- You can also check this in Google Search Console to find any additional links SEMRush might have missed.
- Note: If you don’t have it set up yet, you can do it by following the steps in SOP 020.
- Go to Google Search Console.
- Select the site you want to check.
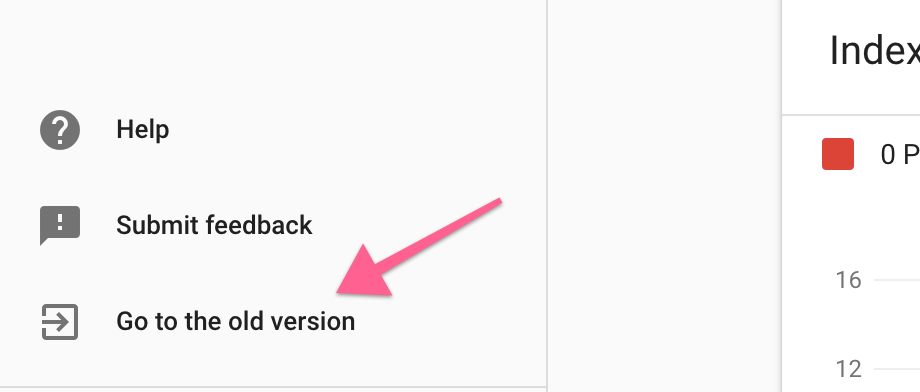
- Note: If your interface looks different from the one on this SOP make sure you are using the legacy interface by clicking “Go to the old version” on the bottom left corner:
- Note: If you don’t have it set up yet, you can do it by following the steps in SOP 020.
- You can also check this in Google Search Console to find any additional links SEMRush might have missed.
-
-
-
- Go to Search Traffic → Links to Your Site. The number of external links connecting to your domain will show at the top of the page.
-
-

Extract a list of your current URLs
There are two ways to extract a list of your current URLs:
- If you have a sitemap and do not want to install a new wordpress plugin, you can use that for the purpose of this SOP.
- Note: Your sitemap is usually found by adding /sitemap.xml to your domain (example: asiteboutemojis.com/sitemap.xml).
- Note 2: If you don’t find your sitemap that way you can try and see if your “robots.txt” file defines a sitemap by adding /robots.txt to your domain (example: asiteaboutemojis.com/robots.txt), if it is defined you will see it as such:

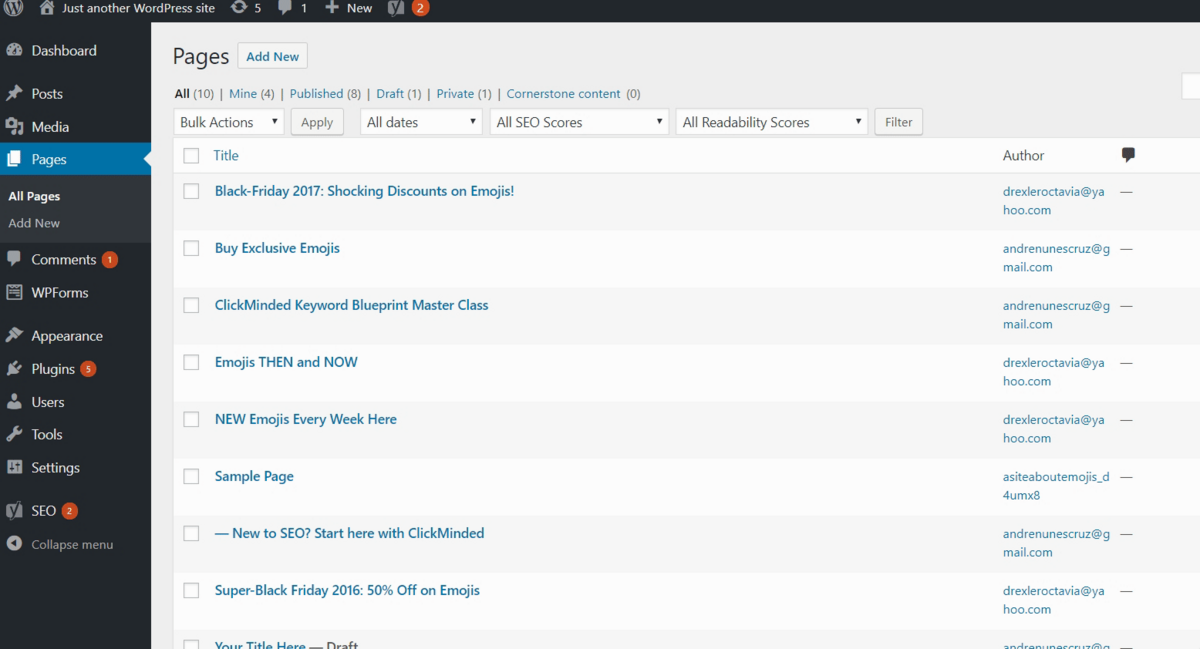
- If you don’t have a sitemap you can export the URLs using the “Export All URLs” plugin on WordPress:
-
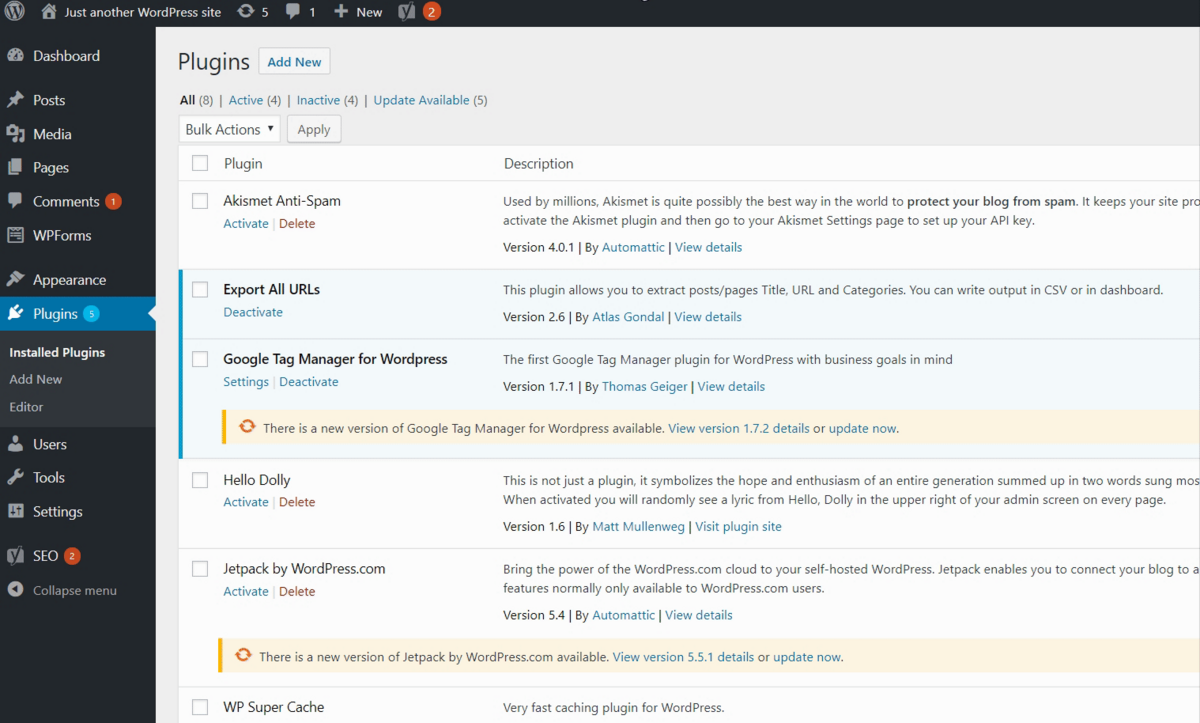
- Download, install, and activate the Export All URLsplugin.
-
-
- To do this, you need to download the ZIP folder at the aforementioned link.
- Go to your WordPress Admin Panel → Plugins → Add New → Upload Plugin.
- Upload the plugin from your computer.
- Click on “Install Now”.
- Click on “Activate”.
-
-
- Go to Settings → Export All URLs.
- Tick “All Types”, “URLs”, and “CSV”.
- Click on “Export” → “Download Now”.
- Select where to download the .csv file.
- Rename it (for the purpose of this example, we used “Exported_Data_All_URLs”, but you can rename it any other way that makes it easy to recognize).
Change the permalinks settings on WordPress
Note: There are rare instances where changing the permalinks of your website may cause it to malfunction. This could be due to conflicting plugins, redirects you might have implemented in the past, custom code, your theme, or other. Even though these situations are not common it is recommended that you have a backup of your website on hand just in case something goes wrong.
Remember: If you haven’t implemented a backup solution for your WordPress website, you can do so by following SOP 053 (web version).
- Go to your WordPress Admin Panel → Permalinks
- Follow these steps, according to the URL structure you want to follow:
-
- Standard – As mentioned before, the standard (and recommended in most cases) URL structure is “Post Name” – so select that option in Permalinks if you want to settle for it.
-
-
- If you select this option, your URLs will look like this: www.asiteaboutemojis.com/all-you-need-to-know-about-blue-business-emojis
-
-
- Custom – You can also select a custom structure that is more personalized for your needs, as described at “Check your current URL structure” in this SOP.
-
-
- To opt for this URL structure, check “Custom Structure”. And enter /%category%/%postname%/ in the text box.
-
-
-
- If you choose this option, your URLs will look like this:
www.asiteaboutemojis.com/blue-emojis/all-you-need-to-know-about-blue-business-emojis
- If you choose this option, your URLs will look like this:
-
Test your old URLs, check 301 redirects and search for 404 errors
To test your old URLs, check redirects and search for 404 errors, you can either use a manual method (faster), or a tool that checks your HTTP Status Codes. (more accurate)
- If you have 10 pages or less on your website:
- Open the URL list that you have extracted on “Extract a list of your current URLs” of this SOP.
Quick test:
- Open the URL list that you have extracted on “Extract a list of your current URLs” of this SOP.
-
-
- Navigate through the URLs by typing them on your URL bar and check if your old URLs redirect to the new pages or if something went wrong and you see a 404 “Page not found” error.
- If the old URL was indexed paste it into a Google search and click on its result. You should not see a 404 “Page not found” error.
-
More accurate test (recommended):
-
-
- Use a HTTP Status Code checking tool:
-
-
-
-
- Go to Browseo;
- Take each of the old URLs on your website and enter them in the search box one by one.
-
-
Note: If you have a lot of URLs you might want to use method B instead.
-
-
-
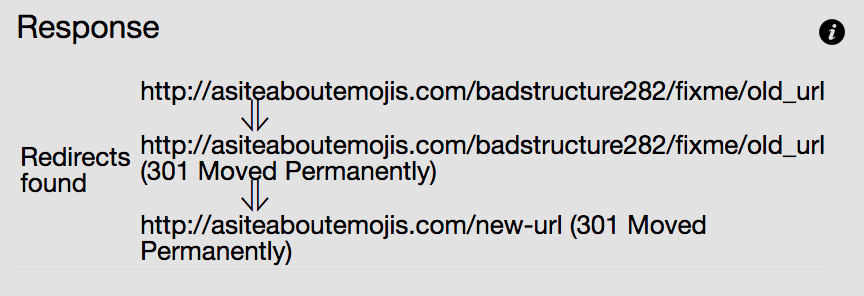
- On the right side of the screen, look at the “response” section:
- 404 (Page Not Found) – If you see this response your redirects were not properly implemented or you are typing the wrong URL.
- 200 (OK) – If you see this response your redirects might not have been properly implemented, make sure you are typing the old URL in browseo and not the new one.
- 301 (Moved Permanently) – This is the response you’re looking for. If you see this one everything should be great.
- On the right side of the screen, look at the “response” section:
-
-
- If you have more than 10 pages – Check 301 redirects in bulk using an automated tool:
-
- Open the list of URLs you saved at “Extract a list of your current URLs“ of this SOP.
-
-
- If you have it in .xml format, convert it to Excel format (you can use this online converter, download the zip file, and extract the Excel file). Open Google Sheets→ Start a new spreadsheet (blank) → Open → Upload your Excel file → Select all cells with URLs → Copy them to the clipboard (Ctrl+C for Windows, or ⌘+C on a Mac).
-
-
-
- If you downloaded it using the “Export All URLs” plugin, go to Open Google Sheets → Start a new spreadsheet (blank) → Open → Upload your CSV file → Select all cells with URLs → Copy them to the clipboard (Ctrl+C for Windows, or ⌘+C on a Mac).
-
-
- Go to https://httpstatus.io/ → paste the list → select “Check status”
-
- Check the “Table View” below. If all the pages have the 200 status code that means the pages have been redirected properly.
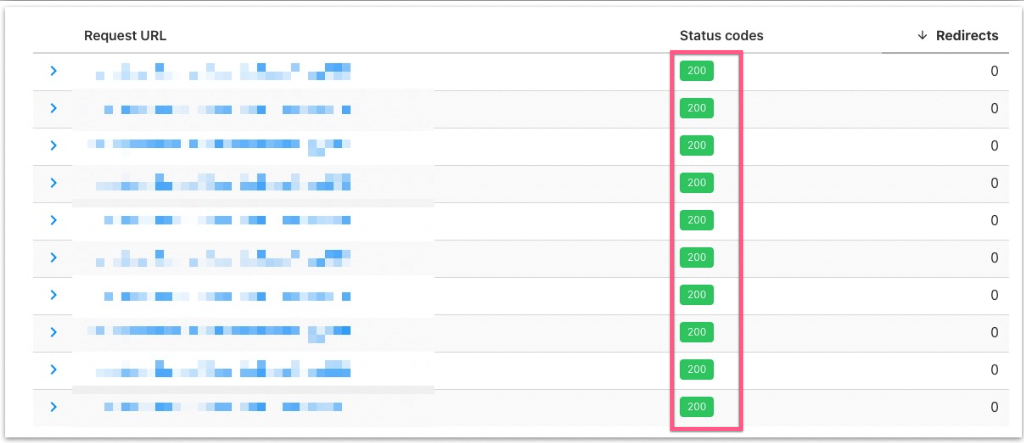
-
-
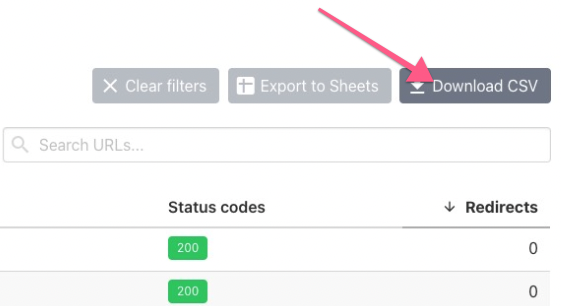
- You also have the option to “Download to CSV” if you want to work the numbers on a spreadsheet or check them against another URL list.
-
Set up 301 redirects for 404 pages
Note: Typically WordPress’s Permalink feature will take care of redirecting your old URLs to the new ones. Sometimes that might not happen (conflicting plugins, previous redirections, custom code, theme features, etc). If that is the case you will want to redirect the old URLs to the new ones.
You can set up 301 redirects by following the steps described in SOP 051 for the URLs that you have identified as retrieving a 404 (Not Found) response, in the previous chapter of this SOP.
Check and update your Robots.txt file
Note: If you were disallowing search engines from crawling your old website structure, you will have to update the robots.txt file (so that search engines know not to index that specific path or page).
- Check your current robots.txt file by going to yourwebsite.com/robots.txt (e.g.http://www.asiteaboutemojis.com/robots.txt)
- If the rules described in your current robots.txt file are not congruent with the URL migration you have performed, make sure to update your robots.txt file.
- Note: For instance, if on your robots.txt there is an entry that is using the old URL structure, you should replace it with the corresponding one in the new structure.
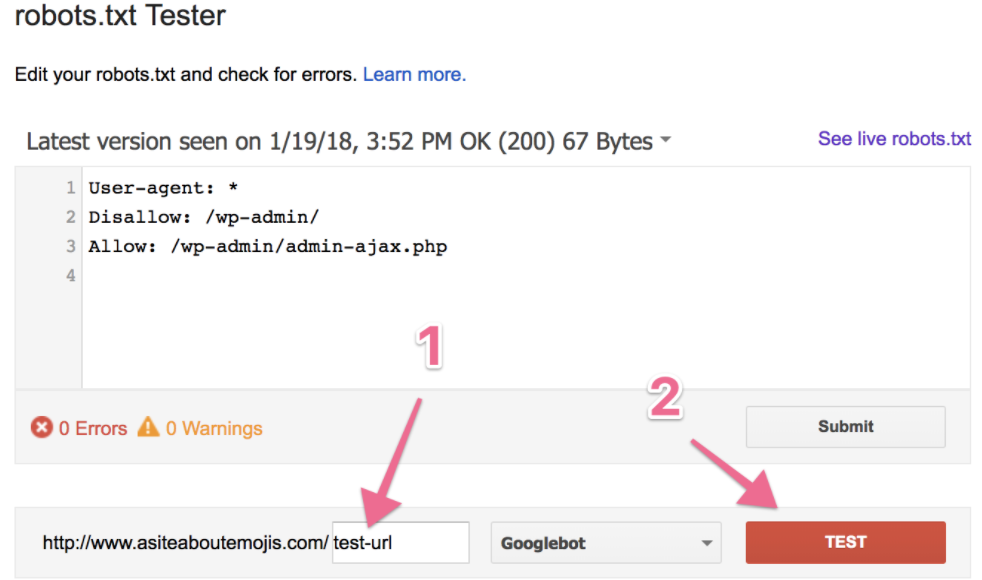
- Note 2: You can test if URLs are being correctly blocked/disallowed in your robots.txt by using Google Search Console’s Robots Testing Tool , entering your URL and hitting “Test”. You will get an “Allowed” or “Blocked” message.
Check and update your sitemap
Your sitemap might have become outdated after changing the URL structure.
Check your current sitemap.
-
- Note: Your sitemap is usually found by adding /sitemap.xml to your domain (example: asiteboutemojis.com/sitemap.xml).
- Note 2: If you don’t find your sitemap that way you can try and see if your “robots.txt” file defines a sitemap by adding /robots.txt to your domain (example: asiteaboutemojis.com/robots.txt), if it is defined you will see it as such:
- If your sitemap is outdated (if the URLs on the sitemap are still using your old structure), you might have to generate a new one.
-
- Note: If you are using Yoast to manage your sitemap it should be generated automatically. If not, make sure you don’t have a cache plugin, If you do you might need to refresh the cache.
Monitor Google Search Console
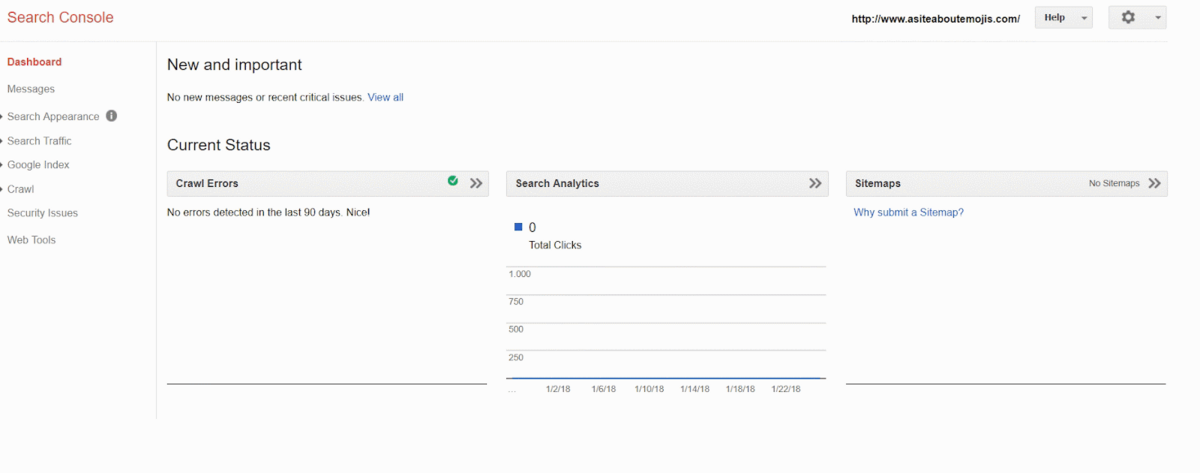
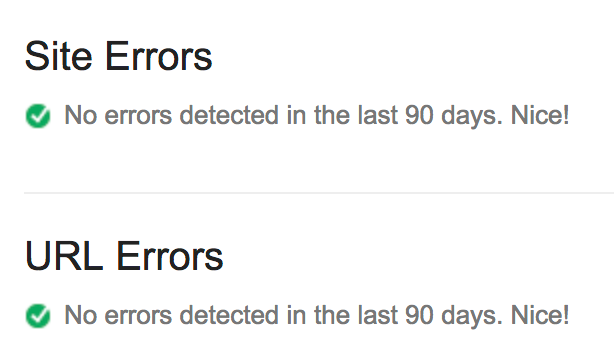
Once you are done with the URL migration process, it is very important to look out for errors. You can do so on your Google Search Console account:
- On your browser open the Google Search Console’s crawl error report, by clicking here.
- Select your website:

- Look for any kind of errors and fix them if they show up, ideally this is how your report should look like:
-
- Important: it may actually take a few days until the errors show up on the Google Search Console, so make sure to come back every day and check for updates.